Forget generic advice like “stay from the edge.” True cliff safety for the adventurous hiker comes from learning to read the invisible language of the landscape. This guide, from a search and rescue perspective, teaches you to decode the geology, wind, and waves to understand the real dangers that catch even experienced explorers off guard, allowing you to capture those breathtaking views without becoming a statistic.
The allure of a rugged coastline is undeniable. For an adventure hiker, standing on the edge of a dramatic drop-off like the Cliffs of Moher or the Na Pali Coast is a powerful experience. You’re there for the heart-stopping views, the wild air, and that perfect photograph that captures the raw power of nature. You already know the basics: wear good boots, check the weather. But as a search and rescue volunteer, I can tell you that those basics aren’t what keep you safe when the ground beneath your feet is actively trying to disappear into the sea.
Most guides will give you a simple checklist. This guide is different. We’re going to move beyond the obvious and into the realm of what I call geodynamic literacy. The real key to safety isn’t just knowing where not to stand; it’s understanding why. It’s about recognizing the subtle signs of instability, predicting the invisible forces of wind and water, and sidestepping the perceptual traps that lure people into making that one fatal mistake.
This isn’t about being fearful; it’s about being smart. It’s about elevating your skills from a simple hiker to a true student of the coastal environment. By learning to read the landscape, you can push your adventures to the edge of spectacular, not the edge of disaster. This article will break down how to interpret these forces, from the stability of the rock itself to the behavior of the waves below, so you can bring back incredible photos and, more importantly, yourself.
This comprehensive guide breaks down the critical elements of coastal cliff safety from a professional’s perspective. Explore the sections below to master the unseen forces at play and ensure your adventures are both thrilling and safe.
Summary: A Search & Rescue Guide to Coastal Cliff Hiking
- Why Do Some Coastlines Crumble While Others Stand Firm?
- How to Get the “Edge Shot” Without Actually Risking Your Life?
- View From Below or Above: Which Perspective Is More Spectacular?
- The Invisible Wind Danger That Surprises Hikers on Cliffs
- When to Visit Cliffs to See the Most Dramatic Waves safely?
- The Erosion Damage Caused by “Just One Photo” Off the Trail
- Why the Driver Can’t Look at the Ocean While Moving?
- How to Photograph Breathtaking Landscapes Without Ruining the Moment?
Why Do Some Coastlines Crumble While Others Stand Firm?
The first step in mastering cliff safety is understanding that the ground you’re standing on is not static. It’s a battleground between geology and the elements. Not all cliffs are created equal; some are granite fortresses, while others are chalk or sandstone, slowly dissolving into the sea. Global research shows cliff recession rates that vary between 1 and 10,000 mm per year, a massive range that depends on rock type, wave energy, and rainfall. This is the essence of geodynamic literacy: learning to read the health of a cliff face.
Your job as an explorer is to become a detective. Before you even think about the view, assess the cliff itself. A critical mistake hikers make is assuming a cliff is stable just because a trail runs along it. After heavy rain, porous rock becomes saturated and dramatically weaker. That seemingly solid edge could be compromised. You need to look for clues that tell the story of the cliff’s recent history and predict its immediate future.
Look for the following indicators:
- Fresh Debris: Look at the base of the cliff. Piles of sharp, fresh-looking rock debris are a red flag for recent, major rockfalls. Weathered, rounded rubble suggests slower, more gradual erosion.
- Water Seepage: Dark streaks or damp patches on the cliff face indicate that water is flowing through the rock, weakening its internal structure from the inside out.
- Fracture Lines: Sharp, clean cracks are signs of recent movement. Older, more stable fractures are often discolored or have vegetation growing in them.
- Vegetation Patterns: A healthy, established cover of plants suggests stability. Bare patches or “scars” on a vegetated slope can indicate a recent landslide.
As a rule, always maintain a minimum distance of 10 feet from sloping cliff edges, and double that distance after heavy rain. This isn’t just a number; it’s a buffer zone against the invisible weaknesses you’ve just learned to spot.
How to Get the “Edge Shot” Without Actually Risking Your Life?
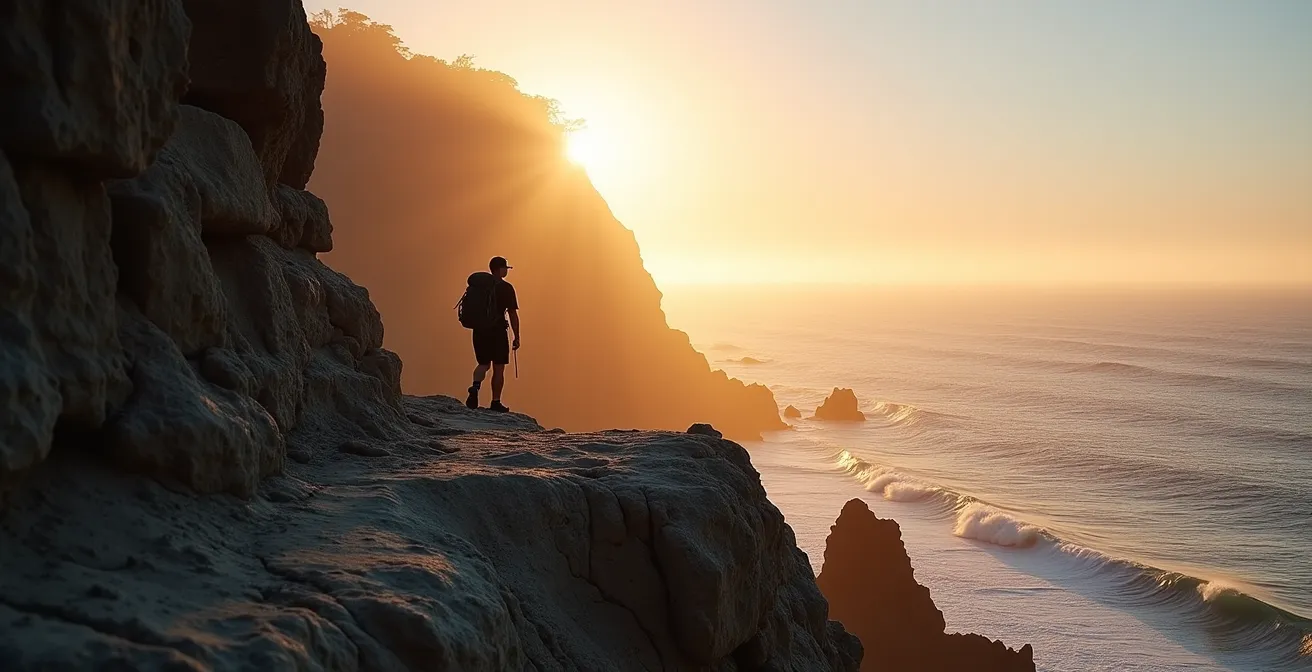
The desire for that epic “edge shot”—the one that shows the dramatic drop to the sea—is a powerful perceptual trap. It pulls photographers closer and closer to a point of no return. The secret that professional photographers know is that you don’t need to risk your life to create the illusion of risk. It’s about using technique and gear, not bravado, to get the shot. Your first priority is never the camera; it’s your footing.
Before you even take your camera out of the bag, establish your safe zone. On a flat, stable surface, this should be at least one full body length from the edge. On any kind of slope, make it two body lengths. Place your gear bag and any other equipment well away from the edge. I’ve seen gusts of wind send backpacks, and the people chasing them, over the side. The shot below demonstrates how a photographer uses gear to create distance and safety.

Once you are in your safe zone, you can use these professional techniques to create a sense of drama without the actual danger:
- Use a Wide-Angle Lens: A lens in the 24-35mm range, positioned low to the ground, can exaggerate perspective and make the drop-off feel immense, even when you’re standing several feet back.
- Deploy a Tripod or Monopod: This is your most important safety tool. Extend your tripod to position the camera over the edge while your body remains firmly planted in the safe zone.
- Compose from a Stationary Position: Never, ever look through your viewfinder while walking near a cliff edge. Plant your feet, get stable, and then compose your shot.
The goal is to separate your body from the camera. Your body stays safe; the camera gets the risky view. That’s the difference between a professional and a liability.
View From Below or Above: Which Perspective Is More Spectacular?
A coastline’s story has two distinct chapters: the sweeping narrative seen from the clifftop (the “Eagle’s View”) and the intimate, powerful story told from the water’s surface (the “Seal’s View”). Neither is inherently more spectacular; they are two halves of a whole, offering profoundly different experiences and photographic opportunities. The Eagle’s View is about scale, context, and the journey. You see the entire coastline unfurl, the curves of the bays, and the way the headlands march into the sea. It’s a story of discovery.
The Seal’s View, however, is about power, texture, and resistance. From below, you feel the raw energy of the waves crashing against the rock. You see the intricate details of erosion, the colonies of seabirds, and the true, intimidating scale of the cliff face towering above you. This perspective is a story of nature’s force. Accessing it is a serious undertaking, typically requiring a guided sea kayaking or coasteering expedition with professionals who understand the tides and swells. The following comparison breaks down the key differences.
This dual-perspective approach is not just a theoretical concept; it’s a core part of how we experience some of the world’s most famous coastlines, as an analysis from sea cliff climbing experts shows.
| Aspect | View from Above (Eagle’s View) | View from Below (Seal’s View) |
|---|---|---|
| Visual Impact | Sweeping scale and context of coastline | Intimate power of waves and rock textures |
| Access Method | Coastal paths and established viewpoints | Guided sea kayaking or coasteering only |
| Safety Level | Moderate (with proper cliff distance) | High risk – professional guides required |
| Best Conditions | Clear days for maximum visibility | Calm seas with good swell patterns |
| Photographic Story | Journey and discovery narrative | Power and resistance narrative |
Case Study: Olympic National Park’s Dual Perspective Approach
Hundreds of beautiful sea stacks and arches have been observed along the coastline of Olympic National Park, Washington. The park perfectly illustrates the value of both viewpoints. It offers established cliff-top trails along its rugged coast for the classic “eagle’s view.” Simultaneously, it provides permits for guided sea kayaking tours, allowing visitors to experience the “seal’s view” of these same dramatic formations from the water level. This demonstrates how both perspectives are considered essential to fully appreciate and understand the complete coastal ecosystem.
The Invisible Wind Danger That Surprises Hikers on Cliffs
Of all the invisible forces on a cliff, the wind is the most treacherous and misunderstood. Hikers often check the general forecast, see a “moderate breeze,” and assume they’re safe. This is a critical error in judgment. A cliff face is not a flat field; it’s a massive aerodynamic obstacle that contorts, accelerates, and redirects airflow in unpredictable ways. This is the danger of aerodynamic deception.
The most common surprise is the funnel effect. As wind is forced through a narrow gap between two headlands or into a cove, its velocity increases dramatically. In fact, wind speed can double when forced through narrow gaps. A 20 mph breeze can suddenly become a 40 mph gust capable of knocking you off your feet. This is why you’ll see rescue reports where a hiker was “suddenly blown over” on a day that wasn’t considered dangerously windy.
Another deadly phenomenon is the updraft. When a strong, steady onshore wind hits a vertical cliff face, it has nowhere to go but up. This creates a powerful column of rising air right at the cliff edge. It can feel deceptively calm just a few feet back from the edge, but as you step into that updraft zone, you can be lifted or destabilized in an instant. It can feel like an invisible hand pushing you up and backward—a terrifying sensation when there’s nothing but air behind you.
Treat every cliff edge as a zone of extreme wind volatility. Always secure your hat and glasses, and keep your backpack’s straps cinched tight. A loose piece of gear acting like a sail is all it takes to lose your balance. Assume the wind at the edge is twice as strong as the wind a hundred feet inland.
When to Visit Cliffs to See the Most Dramatic Waves safely?
Capturing the power of the ocean requires being there when the waves are at their most spectacular. But this is a dangerous dance between spectacle and safety. The biggest waves often coincide with the most dangerous conditions—high winds and storm surges. The key is not to be there *during* the storm, but in its aftermath. This is where understanding hydrodynamic power becomes a photographer’s greatest asset.
The most dramatic and photogenic waves are generated by “ground swell” from distant storms. This energy travels for hundreds of miles, arriving long after the local wind and rain have passed. This creates a window of opportunity: massive, powerful waves under safer, clearer skies. To time this perfectly, you need to think more like a surfer than a hiker and use advanced forecasting tools.
Here is a professional’s checklist for timing the most dramatic—and safe—wave action:
- Post-Storm Window: The best time to visit is often 12-24 hours after a major storm system has passed. The dangerous local weather is gone, but the large ocean swell remains.
- Target Spring Tides: The highest tides occur during the full and new moons. These “Spring Tides” bring the water level highest up the cliff base, creating the most dramatic impacts.
- Check Swell Period: Use surf forecast websites (like Surfline or Magicseaweed) and look for a long “swell period” (14 seconds or more). This indicates powerful, organized waves that create spectacular explosions of spray.
- Time Your Arrival: Plan to arrive at your location about 2 hours before high tide. This allows you to watch the wave action build while ensuring your access and escape routes are still well above the water line.
– Monitor Swell Direction: For the biggest impact, you want a swell direction that is perpendicular to the cliff face you are photographing.
The tides have to be carefully considered, as you don’t want to lose your gear, or worse, at high tide.
– Sea Cliff Climbing Safety Guide, Advnture Magazine
The Erosion Damage Caused by “Just One Photo” Off the Trail
One of the most insidious dangers on a clifftop isn’t to the hiker, but from the hiker. It’s the damage caused by the “just one photo” mentality. Every adventure hiker wants a unique angle, a shot that no one else has. This often means stepping off the designated path to get closer to the edge or to frame a shot without other people in it. While it may seem harmless, this single act, multiplied by thousands of visitors, is devastating to fragile coastal ecosystems.
Clifftop vegetation is highly specialized and incredibly fragile. These plants are slow-growing, low-lying species adapted to high winds and salt spray. Their root systems are the glue that holds the topsoil together, preventing it from being washed or blown away. When you step on them, you crush the plants and compact the soil, creating a weak point. As a rescue volunteer, I’ve seen firsthand how a single footprint in the wrong place can start an erosion scar that won’t heal in our lifetime. This creates what are known as “social trails”—unofficial paths that quickly turn into eroded gullies, accelerating the retreat of the cliff edge for everyone.
The consequences are real and have led to access restrictions in many famous locations. Here’s a stark example:
Case Study: The Price of a Photo at the Cliffs of Moher
At the world-famous Cliffs of Moher in Ireland, the cumulative impact of photographers creating social trails for “unique” angles caused severe erosion and landscape degradation. As a direct result, park authorities were forced to implement strict measures. Today, as their official site confirms, access restrictions now limit an 800-metre stretch of the path. Visitors are required to stay on designated trails and are warned never to go beyond walls or barriers. This case is a powerful reminder that individual actions collectively determine the future of these landscapes.
The best photo is not the one that damages the landscape. The most professional and ethical photographers find their creativity within the bounds of conservation. Stay on the path. Use your lens, not your feet, to find a unique perspective. The future of these wild places depends on it.
Why the Driver Can’t Look at the Ocean While Moving?
Many of the world’s most spectacular coastal cliffs are accessed via equally spectacular coastal roads. The temptation for the driver to steal glances at the breathtaking scenery is immense, and it’s one of the most common causes of accidents in these areas. This isn’t a matter of poor driving skill; it’s a well-documented cognitive flaw called inattentional blindness. When your brain is captivated by a stunning view, it literally stops processing information from your other senses, including the crucial visual data needed for driving.
The numbers are frightening. Cognitive science research on driver distraction shows that a glance away from the road for just a few seconds has serious consequences. At 50 mph, a common speed on scenic highways, a three-second glance at the ocean means you can travel over 220 feet completely blind to what’s happening on the road ahead—a stopped car, a cyclist, or a sharp, unannounced curve. This is a perceptual trap that has led to countless tragedies.
To combat this, your hiking group must make a safety pact before the car even starts. The rule is absolute: the driver’s only job is to drive. The scenery is off-limits while the vehicle is in motion. To make this work, you need a clear system.
Your Action Plan: The Coastal Driver’s Safety Pact
- Define Roles: The driver focuses 100% on the road. A designated passenger acts as the official “scenery spotter,” calling out upcoming viewpoints.
- Pre-Plan Stops: Before you leave, use a map to identify official, safe scenic pullouts. Make these your planned destinations.
- Eliminate Spontaneous Stops: Never brake suddenly or pull over unexpectedly for a view. Signal your intent to pull over well in advance and check your mirrors thoroughly.
- Solo Traveler Rule: If you are driving alone, the rule is even stricter. You only get to enjoy the scenery when the car is safely parked in a designated area with the engine turned off.
- Full Stop Commitment: A “quick look” doesn’t exist. Viewing the scenery happens at a full and complete stop, or not at all for the driver.
Key Takeaways
- True safety lies in “geodynamic literacy”—learning to read the signs of rock instability, wind patterns, and wave dynamics.
- Create dramatic “edge shots” safely by using gear like tripods and wide-angle lenses to create distance between your body and the cliff edge.
- Protect fragile ecosystems and prevent erosion by always staying on designated paths; the best photo isn’t worth the damage.
How to Photograph Breathtaking Landscapes Without Ruining the Moment?
You’ve made it to the viewpoint safely. You’ve respected the trail. Now you’re faced with a final challenge: how to capture the majesty of the moment without letting the process of photography ruin the experience itself? Too often, we get so caught up in fiddling with settings, changing lenses, and checking our screens that we forget to simply be present. The memory becomes a series of technical decisions rather than a feeling of awe.
To counter this, adopt a mindful photography framework. This separates the act of experiencing from the act of documenting, ensuring you get to do both fully. The most effective method is the “Scout, Shoot, Savor” framework. It’s a simple, three-phase approach to your time at a viewpoint.
- Scout Phase (First 20 minutes): When you first arrive, leave the camera in your bag. Walk around. Feel the wind. Listen to the waves and birds. Use all your senses to experience the place. During this time, you’ll be mentally noting compositions and light without the pressure of the camera.
- Shoot Phase (Next 30 minutes): Now, take out your camera. This is your dedicated technical time. You’ve already scouted your shots, so you can work efficiently and with full focus on the craft of photography. Get the shots you identified.
- Savor Phase (The rest of your time): Once your dedicated shooting time is up, the camera goes away completely. Put it back in your bag. This is crucial. You’ve got your shots; now you are free to simply sit, watch, and be fully present in the moment, creating a memory that isn’t filtered through a viewfinder.
This disciplined approach not only improves your personal experience but can also improve your photography. By scouting first, your compositions become more intentional. By putting the camera away, you protect the pure, human memory of being in that incredible place.
Equip yourself with this knowledge, plan your next adventure with respect for the environment, and bring back not just stunning photos, but also the confidence of a true coastal explorer. Stay smart, stay safe, and enjoy the view.